Burning the Raspberry Pi OS image
I strongly recommend using the latest Raspberry Pi OS image 32bit from Raspberry. The distribution has the tools and never fails configuring the machine with headless acccess. - Official installation guide
Tools for burning the image, in order of preference: - Raspberry Pi Imager: convenient, autodownloads the image for you and caches it in your PC. - Balena Etcher: needs the image to be downloaded beforehand. - dd: needs the image to be downloaded beforehand.
Initial SD Card setup
Mount your SDCard in your PC and access the boot directory. Therey, you need to do three things:
-
Create an empty ssh file, marking the enablement of the SSH daemon
touch ssh -
Configure the on boot wifi by creating a
/boot/wpa_supplicant.confand modifying your network configurationssidandpskto match your wifi network configuration. Here's one simple example:Here's a more complex example with two wifis and priorities set:ctrl_interface=DIR=/var/run/wpa_supplicant GROUP=netdev update_config=1 country=ES network={ ssid="Your network name/SSID" psk="Your WPA/WPA2 security key" key_mgmt=WPA-PSK }ctrl_interface=DIR=/var/run/wpa_supplicant GROUP=netdev update_config=1 country=ES network={ ssid="SSID of my 4G mifi" psk=<PASSWORD> key_mgmt=WPA-PSK priority=2 id_str="roaming" } network={ ssid="SSID of my home wifi" psk=<PASSWORD> key_mgmt=WPA-PSK priority=1 id_str="home" } -
Enable UART to allow serial connection to the RPi by adding the following the
/boot/config.txtfile:# Enable UART enable_uart=1
Initial Connection
You have two connection options:
- Through SSH: the Pi should have connected to the WiFi you set up before. Find out the IP your DHCP has assigned to it, and connect to it using the credentials
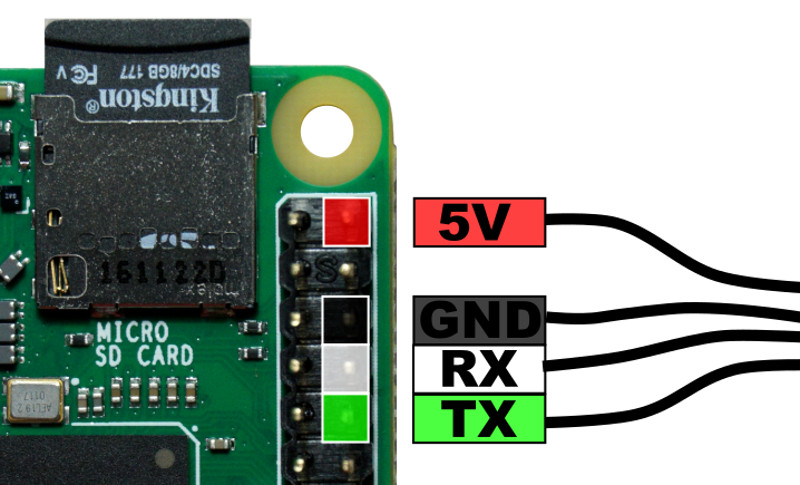
pi/raspberrypi - Through serial: connect the four cables as specified in this Adafruit page. Note that you will need a serial cable (Adafruit's one is perfect) and the cable can power the Pi itself.
For serial connection, please connect an Adafruit cable as shown in the image (only connect the Vcc terminal if you're not powering up the Pi with a power USB cable):
Enable VNC access
Now that we have access to the Pi, we can configure VCN to be able to have graphical access to Raspbian OS.
Enable the service
Run Raspi-config and enable VNC:
sudo raspi-config
Additional VNC configuration
If you rebooted after applying changes with raspi-config, relog into the RPiW, and become root
sudo su -
Set a VNC password:
vncpasswd -service
Enable VNC authentication and disable encryption
cat <<EOF >> /root/.vnc/config.d/vncserver-x11
Authentication=VncAuth
Encryption=PreferOff
EOF
The final file should like something like this:
Password=[REDACTED]
Authentication=VncAuth
Encryption=PreferOff
Reboot your Pi and test everything:
sudo shutdown -r now
Additional WiFi configuration
To generate and encrypted password for the wpa_supplicant file:
wpa_passphrase SSID
To show connected networks:
iwconfig
wpa_cli + ENTER
list_networks → Numbers the networks, shows if they’re CURRENT or DISCONNECTED
select_network [number] ← Put here the number of the network previously listed.
quit → Quits the tool
Additional Serial configuration
Minicom uses an environment variable to pickup configuration called MINICOM. Set it up so you don't have to specify the connection port all the time:;
export PORT=/dev/cu.usbserial-30
export MINICOM="-D $PORT"
minicom
/boot/cmdline.txt(Warning, these lines are for the Raspberry Pi B only. See the official docummentation for specific configuration lines, they'll be different for different Raspberry Pi models)
  # For Pi 1, Pi Zero and Compute Module (BCM2835)
  earlycon=uart8250,mmio32,0x20215040
  earlycon=pl011,mmio32,0x20201000